Making Ointment
I've taken up making ointment from the medicinal herbs in my garden and flowerbeds. I seem to do better every time I try, and my ointments improve. You too, can do this up as it is not hard to do. If you have certain herbs in your garden, or can find them wild nearby, you are nearly there. Olive oil and beeswax give the herbs a medium to apply to skin.
If you do not have a double-boiler pot in your kitchen, you can find a stainless steel bowl that fits into one of your small to medium pots. Then you are almost ready for making ointment!
Some years ago, I hunted online and found some recipes for calendula ointment, but I have adapted it a number of times, so what I give you here, is my basic plan, which you can also use as an outline and adjust according to your needs, or the herbs you have at hand. Today you can find many other recipes online. Making ointments has become a popular activity.
Basic Recipe for Making Ointment
About a week in advance pick, wash, and air-dry herbs like calendula, plantain, comfrey, and the like (study up on herbs beneficial for application on your skin). If you put fresh herbs into your ointment it will not be long before it will go rancid and smell awful. Also, in the dried state, the active ingredients become more potent. Crumble the dried leaves or flowers into a jar to store indefinitely. When you have time you can make the ointment.
To begin this ointment batch, put water in the lower pot of a double boiler (use use a stainless steel bowel fitted over a regular pot. In the upper pot or steel bowel put a cup of olive oil. (For a smaller batch divide all quantities in half).
Shave beeswax from a block with a strong knife, until you have half a cup of shavings to a whole cup of oil.
Turn on to a low heat - just enough to melt the wax.
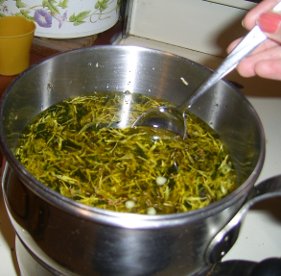
Measure out about two cups of dried herbs. Because my favourite herbs, calendula, comfrey, plantain, and mint are usually handy in my jars, I often mix them for a bit to get the benefits of several at once in one batch of making ointment. Drop the dried herbs into the melted wax/oil to start making ointment.
Stir them all together so the herbs are coated, but do not bring it to a boil. That kills the benefits out of the ointment. When the wax is well melted, and the herbs coated, turn off the heat and set the whole mixture, pot and all aside for a number of hours. I prefer over night.
The next day when I have my ointment jars clean and ready, I put the pot and mixture back on the stove element and heat again, just until the wax is liquid again.
Take note of the wax texture when it is still firm. Is it too firm or too soft? If it is too soft for your taste, quickly shave off some more beeswax - maybe a handful, and add it to the mix and wait until it melts. If the cooled state looks too firm to apply as ointment, add a bit more olive oil.
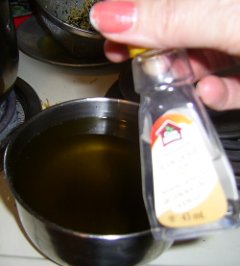
When I remember, I also add a few drops of an oil for scent. I like almond or coconut from my food flavourings. This should be at the end, too early and the scent will all have evaporated from the heat. Sometimes I open some vitamin E capsules too, or some aloe vera, and drop them in as well.

Set up a sieve and another stainless steel bowl and a large spoon. Spoon all the saturated herbs out of the liquid part, and strain through the sieve, but do not rub it in there with the spoon. Just stir lightly so the liquid part, which is your ointment comes through. When you have the top pot all empty, wipe it out with a paper towel. If the liquid that is now separated from the herbs is looking a little muddy, put it back into the upper pot, and after cleaning your sieve (the finished herbs can go in the garbage now), strain the liquid portion again. perhaps through a coffee filter laid into the sieve. Then you'll be making ointment that is more pure and clean.
At this stage the ointment is likely to look fairly dark green. Don't worry, it will go much lighter when it has hardened in the jars.
Pour the clean ointment into your ointment jars before it becomes too hard. If it has cooled too much it looks lumpy, so you may need to put it over the heat just momentarily to return to liquid state. Once poured, set the jars of ointment aside to cool and harden - hopefully to just the texture you like best. When cooled, put on the lids, and set away in the fridge. (Remember, we have not added any preservative. But the ointment can last up to six months at room temperature, before it begins to smell odd.
My Most Recent Comfort Ointment
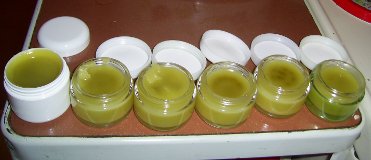
I just made a fresh batch, using my basic recipe plan above for making an ointment that had a cup of dried calendula petals, and a cup of dried, crumbled comfrey leaves. I got six jars full, plus I scraped what was left on my stirring spoon into an old film cannister container. I've been using that part for myself. It has been very soothing on my hives and insect bites.
I prepared nice labels for the six good-looking jars, and took them along to a multi-family garage sale. I had no problem selling three of them right away. I brought the other three back to my fridge, and I know that when I let certain friends know I have ointment on hand again, they will soon be buying those from me. I just don't have time to do this on a large scale.
 I have a few Meta patches by Voxxlife; I'll give you one as a FREE sample, if you would like to try it out. Just get in touch
with me personally. IF you know you want to buy a package of them go to:
VoxxLife.com/shop/ and check out lots of Wearable Tech! (The Meta patches help with your Advanced Metabolism).
I have a few Meta patches by Voxxlife; I'll give you one as a FREE sample, if you would like to try it out. Just get in touch
with me personally. IF you know you want to buy a package of them go to:
VoxxLife.com/shop/ and check out lots of Wearable Tech! (The Meta patches help with your Advanced Metabolism).
Handy Herbs
- Definitions
- Herbal Remedies
- Herbal Respiratory Remedies
- Ragweed the Hay Fever Villain
- 8 Remedies for Hay Fever
- Herbal Teas
- Jethro Kloss
- Back to Eden
- Malva
- Plantain
- Mint
- Parsley
- Calendula
- Sensitive Skin
- Making Ointment
- Apple Cider Vinegar
- Bacterial Vaginosis
- Importance of Bile
- Natural Arthritis Remedies
Bookmark this page:(right-click on this link) making ointment. Choose "Save Link" on popup menu - & follow instructions.
Copyright (c) 2008 - 2024 Ruth Marlene Friesen - Saskatoon, SK. Canada
Your privacy is respected; your friendship is treasured!
![]()
[Disclaimer: This site contains affiliate links; I may profit if you click a link and make a purchase].